After deleting DesktopServer and Flywheel, I decided to install AMPPS on my Acer desktop with Windows 10. This time, I bid farewell to frustration and confusion.
I followed along the instructions on Themetry and made changes whenever something breaks, another lesson to learn.
Tip: I dumped all the information on a note file which is easier and faster to open. I’ll refer to this file every time I have to use AMPPS.
Steps on How to Install AMPPS on Windows 10
I also included the part on how to install WordPress in AMPPS because it’s my preferred blogging platform after using Blogger by Google.
Step 1: Download AMPPS. Microsoft Visual C++ 2017 Redistributable (x86) – 14.10.25017 will also be installed.
Step 2: Set a password on Secure AMPPS. Go back home (http://localhost/ampps/index.php?)

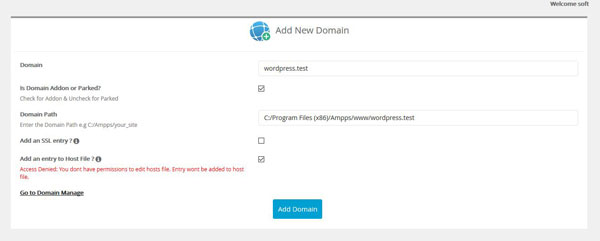
Step 3: Click Add Domain. Choose any domain (I chose wordpress) and create a fake domain using these extensions:
.test
.example
.invalid
.localhost
Domain: wordpress.test
Domain Path: C:/Program Files (x86)/Ampps/www/wordpress.test
Step 4: Go to the domain eg. wordpress.test
Home: localhost
URL: http://localhost/wordpress.test/
To avoid any issues and stay organize, delete an unused domain:
- Home > Manage Domain.
- Delete the folder (of the domain) in C:\Program Files (x86)\Ampps\www or else the domain will still appear in localhost.
Now it’s time to install WordPress on AMPPS.
Step 5: Download and extract WordPress on http://localhost/wordpress.test/
Step 6: Set up a database: Home > phpMyAdmin > click New > click Create.
Step 7: Go to http://localhost/wordpress.example/ to connect the database. You will be redirected to http://localhost/wordpress.test/wp-admin/setup-config.php
Step 8: Click Let’s go! and Enter.
Step 9: Enter information:
Database Name: datwordpress (an example created earlier in step 6)
Username: root (default value)
Password: mysql (default value)
Database Host: localhost (default value)
Table Prefix: wp_tlwordpress_
Step 10: Click Run the installation.
Step 11: Enter the Information needed.
WordPress Log In Information
Site Title: My WordPress Site
Username: another username (different from step 9)
Password: another password (different from step 9)
Your Email: any valid email

Step 12: Click Install WordPress. From here you are good to go. You can log in to the blog and install plug ins and start writing posts. If you want to tidy up a little bit, move on to step 13.
Step 13: Move WordPress to a folder. If you are like me, moving the WordPress to a directory is a time well spent in the beginning. In every installation of WordPress on a server. On this post follow steps 7 to 10.
Additional Resource: Method II (with URL Change) on codex.wordpress.org
Note: Ignore the error Oops! That page can’t be found.
index.php and .htaccess are both in the root and sub folder. I changed the address in the index.php in the root folder as mentioned on codex.wordpress.org
Step 14: Log in at http://localhost/wordpress.test/blog/wp-login.php
I want to create two domains for WordPress installation. One with WordPress files and the other with plug ins and edited settings (WordPress, Genesis, and Yoast etc.) With this setup, my goal is to reduce the time of creating a blog or static site.
Leave a Reply